Saturday, February 11, 2012

Low Calorie Individual Cakes as Easy as 3-2-1

Pinterest is a wonderful place...I can wander aimlessly through pages and pages of other's best recipes and nifty ideas. I only recently became a member of Pinterest, and it's a good thing because I never would have had the kind of time I spend on that website when I was working. For those of you who aren't hooked on Pinterest, or don't have the hours to spend surfing...I will let you in on some of the best stuff.

Today's find is a neat trick for an individual serving of dessert called "3-2-1 Cake". And what's even better? Each serving is only 100 calories!


Here goes...Take one box of angel food cake mix and one box of any other flavor of cake mix (chocolate, lemon, butter pecan, etc). Mix the two dry mixes together and store in an airtight container. That's it! That's the basic mix.


When the you'd like a light snack or a late night craving hits you can satisfy it by counting down "3-2-1"...

Put 3 tablespoons of dry mix in a coffee mug.

Add 2 tablespoons of water.

Mix well.

Microwave for 1 minute.

That's it! You have an individual serving of warm satisfying cake with just 100 calories! Now, I have to admit my servings rarely stay at 100 calories because I usually add one of the following: a dollop of whipped topping, some fresh fruit, a few chocolate chips, some canned frosting, or some of the bottled glaze available in the baking supply aisle of the grocery store. And of course I enjoy a cold glass of milk with my warm cake.


This will never replace a luscious layer cake, or a donut from my favorite bakery, but when the sweet tooth strikes sometimes you have to make do with what you've got!

Hmmm...yummy, quick, low cal treat without a lot of leftovers...Mmmm works for me!!

What's the Taste Tester's Bottom Line?

There's just something about warm cake and cold milk. Everyone who tries this likes it. I will warn you it has a spongy appearance when you take it out of the microwave. But as I suggested, if you put whipped topping or fruit on it you'll never notice the difference. A favorite of my taste testers was putting about a tablespoon of mini chocolate chips on it right after you take it out of the microwave. Wait 2 minutes and you have a chocolate frosting. Another thing to keep in mind ~ the angel food cake dilutes the other cake's flavor. If you want a strong chocolate flavor use the darkest chocolate cake flavor you can find and you might want to add chocolate chips to the batter.

Bottom Line: I have an airtight container filled with the mix in my pantry right now, and I'm thinking of what flavor we'll try next!

Friday, February 10, 2012

Fish Is My Friend ~ Tilapia Tacos with Lemon Herb Sauce


Actually, fish is not really my friend, it's more like an annoying acquaintance. I wouldn't say I HATE fish...I just don't LIKE fish. GoodMan, on the other hand, enjoys fish...he even orders fish when we go out to eat! (How crazy is that?!) Of course, if he didn't order it out he would rarely get the chance to eat it. I have come to realize how unfair that is, so I'm trying to find fish recipes I will want to make at home.

This is a recipe I tried recently. I keep hearing about fish tacos. I have a hard time imagining ordering fish tacos when I go out. If I'm in a Mexican restaurant I can think of any number of dishes I would order ~ fish tacos is not one of them. But I thought I'd try it at home. I put this recipe together with items I had in my kitchen. I'm sure it is nothing like the fish tacos you get at a restaurant ~ because I have never ordered them in a restaurant!

Here's what I did to make Tilapia Tacos with Lemon Herb Sauce:

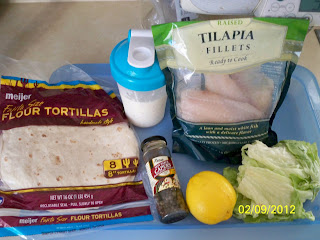
These are the ingredients I assembled: Tilapia fillets, home made Ranch dressing, capers, lemon, lettuce and flour tortillas.

I started with the lemon herb sauce. I grated the zest of one lemon into my mini food processor.


I added the the juice of one lemon.


And 2 tablespoons of capers.
Then I added one cup of my home made Ranch dressing (just follow the directions on the back of the Hidden Valley Ranch Dressing packet).

I processed everything and then poured it into a dish and added a sprig of parsley as garnish. I put that in the refrigerator while I prepared the fish.

I put olive oil in a fry pan and set the temperature to medium high. I really don't like WET FISH (I think it reminds me of where it's been), so I prefer it to have a little crunch to it. Tender, flaky, moist fish is not what I'm looking for here. I want it a little crispy, and cooked till all that ocean is out of 'em!


When the pan was good and hot I added the fillets. About this time I realized I have no seasoning whatsoever on the fish, so I sprinkled seasoned salt on both sides. I cooked them for about 4 minutes on this side.


And another 4 minutes on this side. I made sure they were opaque and flaked easily with a fork...if there is one thing I don't want to find it's a undercooked piece of fish!


While the fish was cooking I wrapped 4 tortillas in foil and warmed them in the oven at 350 degrees. They can also be warmed in the microwave (without the foil!)


When the fish was done I put fish, lemon herb sauce and lettuce on a tortilla and rolled it up. I had to use toothpicks to keep it together ~ but that worked!


This was the final product. Aren't they lovely? All warm and a little crunchy and saucy...just waiting for some fish-lover to come along.


What is the taste tester's bottom line?

We decided I was a little heavy-handed with the lemon juice. The sauce made you want to pucker. GoodMan liked the fish and he liked the whole taco idea. He thinks next time he'd like to try it with salsa (oh sure, go all Mexican with the whole taco idea). He's probably right, a little cumin might have given it more of a taco vibe.

The bottom line: Fish is still only an acquaintance for me, not my friend ~ but I'll make it again, with a few tweaks.

Thursday, February 9, 2012

Stawberry Angel Dream Cake


Wow! Isn't that just the prettiest thing you ever saw? Almost too pretty to eat...Almost.
This gorgeous creation started out as a recipe I found on the Kraft foods website. The main tweak I made was making my own angel food cake in a bundt pan instead of using a prepared (store bought) angel food cake. What caught my eye was not only the beauty of this dish, but the 140 calories per portion. This just seemed like a dessert I could serve my family without guilt.
Here's how I started...


The ingredients I gathered were a quart of strawberries, an angel food cake mix (and the 1 1/4 cup of water it called for), 1/2 package of cream cheese (the 1/3 less fat kind), an orange, sugar and Cool Whip Lite.


  The first thing I did was to make the angel food cake according to the package directions. I took pictures of that process, but as it turned out I didn't have a memory card in my camera...sooo...let's just pick it up here. I used a decorative bundt pan. I LOVE my bundt pan, but it was a bit of a challenge getting the cake out of the pan...just too many nooks and crannies. I held back three cups of the batter and put it in a loaf pan because my bundt pan doesn't hold as much as a tube pan. I even thought about buying a premade angel food cake (oh I know you sometimes cheat with store-bought too!), but my grocery store was out of them. As it turns out I like the look of this cake, and the extra loaf of angel food cake will work for a meal I'm taking to a young couple from church just home from the hospital with a new baby, so it's all good.
  After letting the cake cool I sliced the cake in half horizontally.


Just like so...a bit of a crumbly mess, but easy enough to clean up. I set the two halves aside while I made the filling.


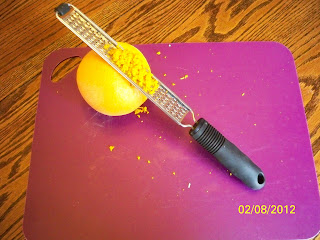
I grated the orange peel, making sure to avoid the white membrane which is bitter.


Then I used that orange to squeeze for the 1 tablespoon of fresh orange juice I needed.


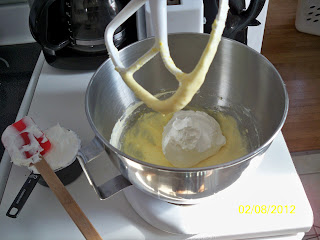
I put the orange zest, orange juice, sugar and cream cheese in my electric mixer's bowl and mixed on low for about 2 minutes until it was smooth.


Next I added the Cool Whip and beat again for about 1 minute, just to combine the ingredients.


At this point I took the bowl off the mixer and gently folded in the chopped strawberries...oh my goodness, this is smelling so yummy!


I used about 2/3 off the bowl of fluffy wonderment as filling between the two layers and the remaining 1/3 was used to frost the top. Then I decorated the cake with extra strawberries cut in halves and pieces. I immediately put the carrier cover on this and put it in my car (out in the cold February weather) so I wouldn't be tempted to have "just a taste" before taking it to my taste testers for dessert later that evening.


Here is the recipe:

Strawberry Angel Dream Cake
(called "Strawberry and Cream Angel Cake" On the Kraft Foods website)

1 quart strawberries (approx 3 cups), divided
4 oz Philadelphia Brand 1/3 less fat Cream Cheese
2 tbl sugar
1 1/2 tsp orange zest
1 tbl fresh squeezed orange juice
2 cups Cool Whip Lite
1 prepared angel food cake (10-inch), cut in half horizontally

Chop 2 cups of strawberries and set aside the remaining strawberries to use as decorations.
Beat cream cheese, sugar, orange zest and orange juice with a mixer until well blended. Add Cool Whip and beat for another 1 minute on low, just until blended.
Fold in chopped strawberries.
Spread 2/3 of the strawberry mixture on the bottom half of the cake. Cover with the top of the cake and the remaining 1/3 of the mixture.
Decorate the cake with the strawberries that were set aside.

What was the taste tester's bottom line?
This recipe looks so beautiful! The taste testers (three grandchildren) had a hard time waiting for dessert-time. All three gave this recipe an enthusiastic thumb's up! GoodMan wondered if it really needed the orange flavor ~ but I thought the orange flavor added a note of complexity to this simple cake.


There wasn't much left after everyone had seconds!

Bottom line: This one's a keeper.


Wednesday, February 8, 2012

Is It a Cake? Is It a Pie? No, It's a Sharlotka!


  I was scrolling around Pinterest the other day and came across a beautiful picture of what looked like a cross between an apple pie and a coffee cake chocked full of apple slices. It was from a blog (with gorgeous photos) called SmittenKitchen.com. After reading the recipe and all the comments I decided to research Sharlotkas by "googling it" and reading all I could find about it. Some sites describe it as a Russian apple pie, others call it an apple cake. I decided it was time to "dish it up" to my taste testers and see what they think.
  I have trouble calling a dessert healthy, but this one is as close to healthy as any dessert I ever made. There is no butter other than what was used to grease the pan, and 1 cup of flour and 1 cup of sugar for the whole cake/pie. Really, including the three eggs there is only enough batter to hold the apples together. One of the sites I researched put the calorie count at 200 per 1/8th of the cake/pie.
  I started with the recipe from SmittenKitchen.com and adapted it slightly. I added some baking soda because most of the other recipes online called for it. I also added some chopped walnuts and cinnamon to the batter because I saw the suggestion on one of the comments posted on one of the recipes. According to one of the web sites a Russian Sharlotka is a lot like an American apple pie in that every family has their own recipe. Hopefully my changes still keep it in the tradition of the Russian Sharlotka. 

First thing I did was preheat the oven to 350 degrees. Then I pencil-traced my 9 inch spring form pan on parchment paper.


I used cooking spray on the bottom of the pan, then put the parchment down and buttered both the parchment and the sides of the pan.


Next, I used my handy-dandy apple peeler-slicer-corer to peel, slice, and core 3 pounds of granny smith apples.


Next, I cut the sliced apples into quarters and placed them in the prepared pan.

The pan should be almost full ~ like this.


Next, I measured 1 cup of sugar, 1 cup of flour, and gathered 3 eggs, vanilla, and cinnamon (I also got walnuts  and baking soda out, but forgot to get them in this picture).


Sugar and eggs went into my mixing bowl. I mixed them for about 2 minutes before adding the vanilla, and cinnamon.


I turned the mixer on for another minute to incorporate the vanilla and cinnamon.


I took the bowl off the mixer and stirred in one cup of flour and 2/3 cup of chopped walnuts.


I added a pinch of baking soda...now quit yelling...it wasn't my idea to measure "a pinch"...that's what the traditional Russian Sharlotka recipes call for...I figure I can pinch as well as any Russian girl.


The batter looks thick, and lumpy (due to the walnuts), and smells yummy (due to the vanilla and cinnamon).


Pour the batter over the apples and wait a minute or two to allow the batter to start seeping down between the apples...Yum!...then pop it in the oven and set the timer for 55 minutes. Now go find something constructive to do to keep your mind off the scent of cinnamon and apples baking in your oven. When the timer goes off check for doneness with a toothpick. The toothpick should have no wet batter on it after inserting it in the middle of the cake/pie.


Take this gorgeous hunk of apple goodness (can you smell it through your monitor?) out of the oven and set it on a rack to cool. After 10 minutes open the spring and (using oven mitts because this is still very hot!) unmold the cake. I do the "double flip" first unmolding on a plate then flipping the cake back over onto the serving dish I plan to use.


Isn't that pretty? I left it to cool for an hour or so and then just before serving I dusted it with powdered sugar.


When GoodMan came home from work and saw the Sharlotka on the table his first words were "Wow! What is that?" as he reached out his hand and snitched a piece of apple (luckily for him I had already taken this picture!)


Ah well, that's what I baked it for, right? This is the actual recipe:

Sharlotka with Cinnamon and Walnuts

1 cup sugar
3 eggs
1 tsp vanilla extract
1 tsp cinnamon
1 cup flour
2/3 cup walnuts, chopped
pinch of baking soda
3 pounds granny smith apples, peeled, cored, sliced in small thin pieces
powdered sugar, for dusting

Preheat oven to 350 degrees. Prepare 9 inch spring form pan by lining with parchment paper and buttering sides and also the parchment paper.
In a mixing bowl, beat sugar and eggs for about 2 minutes. Add vanilla and cinnamon and beat again for 1 minute.
Remove the bowl from the mixer and stir in flour, walnuts, and baking soda. Just stir to combine ~ do not over mix.
Fill the spring form pan with sliced apples and then pour the batter over the top. Wait a minute or two to let the batter start to seep down between the apples.
Bake for 55 minutes, or until toothpick inserted in the center comes out with no wet batter.
Cool on a rack for 10 minutes.
Unmold from spring form pan and "double flip" onto serving platter.
Serve warm or cold with a dusting of powdered sugar.


What is the taste tester's bottom line?

  GoodMan liked the presentation. He thought it looked "Wow!" when he first saw it. He liked the healthy aspect of it (you'd have to know GoodMan ~ the only husband I know who is more into "healthy" than his wife). He liked the cinnamon and walnuts, but he wondered if it could be made with another kind of apple because he found it to be a little more tart than he expected. What is weird is that I absolutely cannot handle tart fruit...and I liked it. I might add a little Truvia to mine to make it a little sweeter, but I don't think I'd like to try another kind of apple because I don't know what kind would hold up and not get too wet or turn to applesauce.
  The bottom line is ~ I would make this again. I'd make it for a potluck, a treat for small-group, to take to a new neighbor or as part of a meal for someone who's been sick...it just has such a special presentation!

Tuesday, February 7, 2012

Crock Pot Hamburger Oriental

This is a Tried-and-True-Tuesday recipe. A recipe I've used many times and we always like the results!


The first thing you should know about my Crock Pot Hamburger Oriental dish is that the only "oriental" thing about it is the Chinese-style vegetables. There is no soy-sauce (although you could always add some), no won tons, no egg rolls, no egg drop, no egg foo young, not even a fortune cookie on the side...So for all of you who don't like Chinese food, don't worry, this is NOTHING like Chinese food. For those of you who DO like Chinese food, I'm sorry I tricked you with the title.  It is really an all American crock pot comfort dish. I adapted this from a recipe called "Chinese Hamburger" in "Fix It and Forget It" which is a wonderful cookbook for anyone interested in crock pot cooking.

This is what you'll need:
  • A large crock pot (mine is a 7 quart ~ you could use one a little smaller)
  • 1 pound lean ground beef
  • 1 onion
  • 1 28-oz can Chop Suey vegetables
  • 1 14-oz can bean sprouts
  • 1 8-oz can water chestnuts
  • 1 can condensed chicken noodle soup (this is not a typo)
  • 1 can condensed cream of chicken soup
  • 2 ribs of celery
First, chop the onion and celery. Don't chop too small ~ you want to know they're there. Besides, the less work the better.

That's a lot of onion! But that's okay, we like it that way. I used a whole onion. You can use less if you want, but then you have to store the leftovers ~ nah, just use the whole thing.

Next, I cook the hamburger and onion on the stove.

Cook the hamburger and onions until the hamburger is browned and the onions are translucent.


Now drain baby, drain...drain the fat and liquid from the ground beef... then drain the liquid from the cans of chop suey vegetables, bean sprouts, and water chestnuts.


Give the water chestnuts a rough chop.

Now it's time to start layering the yummy goodness in the crock pot. I don't think the order is particularly important, but here's how I do mine.

First the cooked hamburger and onions. Then the drained chop suey vegetables, bean sprouts, water chestnuts, and celery.
Next comes the cans of soup. It doesn't matter which one comes first.

When everyone has joined the party it's time to put a lid on it and set the crock pot to cook for 4 hours on high or 7 hours on low.

I serve this over rice. When I was working I would have the meat browned ahead of time and I would put the crock pot together on my lunch hour (I live 6 blocks from my former office). The timing was perfect for me to come back 4 hours later and just get some rice started. As the rice cooked I had time to change out of my office clothes and set the table. I know not everyone lives close enough to get this started on their lunch hour. Maybe this recipe has to be saved for those days when someone is home to start it. GoodMan is great at doing those kinds of things when needed. I leave him with instructions or more likely give him a call when it's time to put the previously prepared crock in the pot and turn it on.


Ta-da! This is the end result. I read on another blog "even ugly food needs love". I guess that could fit for this dish. It's not the most colorful, but it's a good go-to recipe for a crock pot meal.


This is the official recipe for Crock Pot Hamburger Oriental:

1 pound lean ground beef
1 onion chopped
2 ribs celery, chopped
1 28-oz can Chop Suey vegetables, drained
1 14-oz can bean sprouts, drained
1 8-oz can water chestnuts, drained and chopped
1 can condensed chicken noodle soup
1 can condensed cream of chicken soup

On stove top, cook hamburger and onion until meat is browned and onion is translucent. Drain.

In a large crock pot, layer the browned meat and the remaining ingredients. Cook on high for 4 hours or on low for 7 hours.

Serve over rice.


What is the taste tester's bottom line?

I made this dish when my mom was here for a visit recently. It got an enthusiastic thumbs-up from her and GoodMan asked for seconds ~ that guarantees I'll be dishin' it up to my family again!
Bottom line: stays in my cookbook under "crock pot favorites".