Friday, April 6, 2012

Swedish Poppy Seed Cake with Lemon Glaze

  Isn't this a pretty cake? I got the beautiful bundt cake pan I used for this cake at Christmas from my son and daughter-in-law. It really makes a nice presentation. One of these days I will find a pretty cake plate to display such a pretty cake ~ I'm still on the look out for something spectacular!
  I've been looking for the perfect poppy seed cake for a long time. I remember one I had many years ago and I've been trying to replicate it for quite a while. This one is not exactly like the one I remember, but sometimes I find good recipes on the way to great recipes. This is one of those times.


Let me show you how to make it:
First, I mixed the sugar and oil.

 And then I added the milk and eggs and mixed again.
 I gathered the remaining ingredients; cake flour, baking powder, salt, vanilla, almond extract, and salt. 
I measured and added the remaining ingredients and then mixed them at medium speed for about 2 minutes.
 I heavily sprayed my beautiful bundt pan with PAM For Baking, making sure to get in to every crease so my cake wouldn't stick. 
 I poured the cake batter into my prepared pan and put it in the oven preheated to 350 degrees. I baked it for one hour and checked for doneness with a toothpick inserted into the middle of the cake. When no wet batter was left on the toothpick I knew it was done.
 This is what it looked like when it was done baking. It smelled wonderful! I let it cool on this rack for about 15 minutes and then I turned it over onto my cake plate to let it cool some more.

 I prepared the glaze as the cake was cooling.
 I poured the glaze over the cake and let it run down the sides.
 And finally, I decorated the cake with a few pieces of sliced lemon.

This is the official recipe for Swedish Poppy Seed Cake:

2 1/2 cups sugar
1 cup oil
3 eggs 
1 1/2 cup milk
3 1/3 cups cake flour
1 1/2 teaspoons baking powder
1 1/2 teaspoons salt
2 tablespoons poppy seeds
1 1/2 teaspoons vanilla extract
1 1/2 teaspoons almond extract

Preheat oven to 350 degrees.
Prepare bundt pan by spraying with PAM For Baking.
In large mixing bowl, mix sugar and oil. Add eggs and milk and continue mixing until all fully combined. 
Add remaining ingredients and mix on medium speed for approximately 2 minutes until mixture is combined and there are no lumps.
Pour into bundt pan and bake for 1 hour.
Check for doneness by inserting toothpick into the center. When the toothpick no longer has wet crumbs attached the cake is done.
Cool on wire rack for 15 minutes before removing from pan.
Invert cake onto cake plate and continue to let cool.
Drizzle glaze over the top and down the sides.

For Glaze:
3/4 cup powdered sugar
juice of 1/2 fresh lemon
2 tablespoons melted butter
Mix all ingredients in a small bowl and drizzle over the top and down the sides of a slightly warm cake

What was the taste tester's bottom line?
This cake was very good. The first day it reminded me more of a coffee cake. By the second day the glaze had seeped into the cake more and it took on a whole new flavor. The consensus was the cake was even better the second day!

The bottom line: I've made this cake a few times now. Since it is better the second day I try to plan ahead and make it early. It works out great for holidays because it can be made ahead.

Thursday, April 5, 2012

Bang on Butterfinger Bites

  If I were to tell you I have a recipe for Butterfinger candy bars would you believe me? You've probably seen a lot of copycat recipes out there for everything from Outback Steakhouse's Bloomin' Onion to Cracker Barrel's Cheesy Hashbrown Casserole. But a recipe for a candy bar? And what if I told you this recipe has only three ingredients? 
  Well, you can believe it! I've seen this recipe on Pinterest. Many of the Pinterest versions are fully covered in chocolate and look more like the traditional candy bar. I am not a big fan of chocolate (gasp!) and I could just not bring myself to cover the whole thing. It is amazing how bang on close these taste to the real thing. And what was really surprising to me was how close the texture is to a real Butterfinger candy bar. 
  I'll show you how I made them:


The three ingredients are candy corn, peanut butter, and chocolate candy coating. That's it! Candy corn is readily available in the fall, but I was able to find it even this time of year in the Brach's candy section of my large grocery store. Oddly enough, candy corn is often sold in big home improvement stores like Menard's and farm supply stores like Quality Farm and Fleet...I wonder if candy corn is a favorite of handymen and farmers?


I put one pound of candy corn in a glass bowl and put it in the microwave to melt. I started it by cooking it for one minute, stirring, and then setting it to cook for 20 seconds, and stirring until the candy corn was completely melted.


Then I stirred in 16 ounces of creamy peanut butter. I stirred and stirred, and stirred some more. I thought my arm was going to break before I got the mixture fully combined. I ended up putting it back in the microwave and warming it again for 20 seconds to try to "loosen" it up. In the picture I am using a rubber spatula. I had to change that to a heavy metal spoon because the mixture was so stiff. 


I kept mixing and stirring until both ingredients were fully combined.


I put the mixture into an 8"x8" parchment lined pan and then put it in the refrigerator to cool. 

 When it was cool I took it out of the pan and cut it into pieces. I wasn't sure if I wanted large candy bar-size pieces or smaller pieces. Imagine cutting up the inside part of a Butterfinger candy bar. It wants to crumble. I tasted a nibble and decided it was really rich (like a candy bar ~ duh!) so I decided to make smaller chunks. 

 At that point I warmed the candy coating in the microwave according to the package instructions. I planned to dip the candy pieces in the chocolate and letting the chocolate set on a piece of wax paper, but I decided instead to just drizzle the chocolate over the tops. I'm glad I did. The orange and brown color looks more like a fall treat, but they tasted like something the Easter Bunny would be happy to deliver!


What was the taste tester's bottom line?
My testers today were my son, Nathan, and his son, Charlie. 
Their big smiles and thumbs-up is the result I look for in a good recipe.

The bottom line: This one's a keeper!

Wednesday, April 4, 2012

Donut Easter Nests

Another Easter treat?...Yep!

I love to have fun treats around the house for my grandkids when they come over. Even more than that, I really enjoy having the grandkids help make the treats. Most of my little helpers are ages 5 - 7 , so I try to look for projects that are not too difficult and time consuming. These cute little Easter nests couldn't be easier or faster.

This is one "recipe" that probably doesn't need how-to pictures, but since I have such a nice long web page with so much space I might as well use it! So here goes...

It doesn't take a lot of ingredients. I got a package of little chocolate covered donuts, some Duncan Hines Amazing Glaze (near the frostings in the baking aisle), a package of jelly beans, and some green-tinted coconut.


To make the green-tinted coconut I put about a cup of coconut in a ziplock bag and added a few drops of green food coloring. Then I zipped the bag closed and shook and massaged the bag of coconut until it looked uniformly green. This is something I let the grandkids take turns doing ~ just had to make sure the bag stayed zipped, and the kids didn't get too crazy with it.


I used a sharp knife to slice the little donuts in half ~ horizontally ~ like a bagel.  If you ever want your daughter-in-laws to let you borrow their children again make sure you do not let the little ones do this part of the project.


Then I had one of the 7-year-olds put some glaze on each donut half. I told him to think of it as glue to hold the grass on the nest. We warmed the glaze in the microwave for about 30 seconds before we used it so it would pour easily. This was a little messy, but easily cleaned up.

Next came the "grass". We put the green-tinted coconut on top of the glaze and gave it a little pat to stick it to the glaze.

We added another layer of glue glaze on top of the grass.

 The final step was decorating our nests with jelly beans. The kids really got into making sure they had three different colored jelly beans on each nest ~ I guess those nests didn't hold one set of twins.

This project start-to-finish took about 20 minutes even working with 5 little kids. I put a piece of paper towel in front of each child and let them each decorate their own. It was easy to clean up; we just threw the paper towel away and did some hand washing when we were done. Unfortunately I didn't get pictures of the kids making their nests because I was too busy to pick up my camera. 

What was the taste tester's bottom line?
The kids had a blast making these. They ate their "nests" so fast, I never got a picture. Some ate them slower, by picking off the jelly beans and eating them one-by-one, but most of them just popped the whole thing in their mouth.

The Bottom Line: At Christmas time I try to have fun cookie or treat projects for the kids to do with me. I think I can add Easter treat making to my memory-making arsenal.

Tuesday, April 3, 2012

Marvelously Meatless Baked Penne Rigate

Recently Grandma came for a visit. When I picked her up for the visit she informed me she gave up meat on Wednesdays and Fridays during Lent. This wasn't too big an issue for me because GoodMan and I are trying to eat less red meat and we've been taste testing quite a few fish recipes. But one Friday during her visit we planned to have two of our sons and their families over for dinner. My family is used to big hearty meals when they come to visit. I had to comb through some old favorites to come up with a dish that would satisfy Grandma's pledge to go meatless and my other family's taste for something more than twigs and leaves.

In my search for a recipe I ran across my old recipe for Baked Penne Rigate. I used to make that quite often when I needed a dish to take to a pot luck dinner or to send to a family with a new baby, or to take to a person just moving in to a new home. It is a really easy recipe to prepare, it can be doubled for a big family, and it freezes really well for baking later. I can't remember why I stopped making it. I probably just started trying new recipes and didn't go back to this old one until now.

If you've ever eaten at a Sbarro restaurant in the malls or airports you may have had their Baked Ziti. My Baked Penne Rigate is very much like that. In fact, you can use ziti, or other types of pasta. I just find penne rigate tends to hold on to the sauce best for this recipe. I made this recipe back when my gown sons were little boys, so I'm afraid if I ever knew where I got the recipe I don't remember it now. 

Let me show you how I make it:

 I'll give you the recipe for a 9x13 pan, but it can easily be doubled or halved. I like to make a double batch and put one half in a 9x13 pan for us and then put the remainder in a couple of smaller foil pans and freeze them for later use. They come in handy when you find a friend in need of an emergency meal. You can pop it in the oven and pick up a packaged salad and some rolls and you've got a complete meal. I've even taken over a couple of frozen loaf-size disposable pans of this to a friend who was scheduled for surgery. I suggested she put them in her freezer and when she didn't feel up to cooking she could just put one in the oven until heated through.
  To make this you'll need 1/2 pound of penne rigate pasta, 15 ounces of ricotta cheese (I use low fat), 3 cups of mozzarella cheese, 1/2 cup of Parmesan cheese, and a 26-ish ounce jar of spaghetti sauce. Our favorite is the Ragu chunky garden style.
I made the pasta according to the directions on the package, but I cut the cooking time short by about 2 minutes so the pasta was slightly undercooked. This is because the pasta will cook more in the oven. While the pasta was cooking I mixed the ricotta cheese and 1/2 of the mozzarella cheese in a large bowl.
When the noodles were cooked I drained them and then mixed them with the cheeses in the bowl.
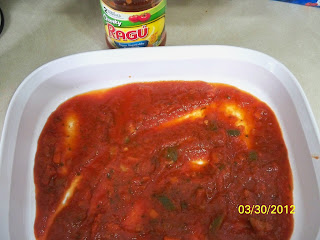
 I spread about 1/2 of the spaghetti sauce on the bottom of the pan. See those chunks of veggies? That's what you get with the chunky garden style spaghetti sauce...enough veggie to make me feel good, but not so much as to be obvious to the kids!
 Then I put the pasta and cheese mixture on top of the sauce, and add the remaining tomato sauce.
 Then I sprinkle the Parmesan cheese on top.
 And finally, I sprinkled the remaining mozzarella cheese on the top of everything else. Then I put it in the oven set at 350 degrees until everything is heated through and bubbly. It usually takes about 25 minutes. I would show you a picture of it right out of the oven, but I was too slow. My family got it out of the oven while I was busy with Grandma and by the time I got there I was lucky to be able to find some left to put on our dishes!
 I added a homemade garlic breadstick and my carb-loaded dinner was complete (I really added a salad, but didn't take a picture of it).

This is the official recipe for Baked Penne Rigate

8 ounce Penne Rigate pasta, cooked and drained
15 ounce package of ricotta cheese
3 cups mozzarella cheese, divided
26 ounce jar spaghetti sauce, divided
1/2 cup grated Parmesan cheese

Preheat oven to 350 degrees.
In a large bowl, mix ricotta cheese and half of the mozzarella cheese.
Stir in cooked pasta.
In a 9x13 glass pan, spread 1/2 of the spaghetti sauce.
Spread pasta and cheese mixture on top of spaghetti sauce.
Put remaining spaghetti sauce on top of pasta mixture.
Sprinkle Parmesan cheese on top of spaghetti sauce.
Sprinkle remaining mozzarella cheese on top of Parmesan cheese.
Bake for approximately 25 minutes, or until heated through and bubbly.

What was the taste tester's bottom line?
This is another family favorite. And now it's passed the test for the newest generation!

The bottom line: Next time I'll make a double batch and freeze some smaller  portions so GoodMan and I can heat them up for quick 2-person dinners.

Monday, April 2, 2012

Naan ~ Indian Flat Bread

Thankfully, GoodMan and I are not on a low carb diet because we both like bread. White, wheat, rye, or pumpernickel bread, raisin bread, beer bread, bagels, breadsticks, biscuits, tortillas, roti, and one of our favorites is naan. If you've never had naan I would describe it to you as a flat grilled bread somewhat like a pita bread, but without the pocket. 

The first time I saw naan was at the grocery store. It looked really good and I was looking for something different to serve with hummus. From the first time we tried it GoodMan and I were hooked. Naan is great eaten with soft foods like hummus, mujadara, and other foods you can scoop with bread. I did a little google research and this recipe is what I adapted from many sources.


Let me show you how I did it:


I started by "blooming" 1 package of yeast in 1 cup of warm water and 1/4 cup of sugar. This means put the ingredients together and let it sit for about 10 minutes until the mixture was foamy.

 I added 1/4 cup of milk, 1 beaten egg, 2 teaspoons salt, and about 4 cups of bread flour (enough to make a soft but not sticky dough). 

 Once the dough pulled away from the sides of the bowl, I set the mixer on the lowest setting and used it to knead the dough for 8 minutes. When that was done. I took it out of the bowl, greased the bowl and then put it back in the bowl, covered the bowl with a cloth and set it aside to rise for 1 hour. 
 Just before the hour of rising was up I finely chopped 4 cloves of garlic.

 When the hour was up I punched down the dough and then kneaded the freshly chopped garlic into the dough. Then I pinched off sections of the dough to form 16 balls ~ I usually divided it in half, each half in half again, and so on until I have 16 even pieces. I covered the tray of dough balls with a towel and set the tray aside for 30 minutes to let the dough balls rise again.

 When the time was up I heated up my cast iron grill pan to medium high and rolled out the first dough ball to a thin, uneven circle. When the pan was hot I added about 2 tablespoons of olive oil to the pan and put the bread dough on the hot grill pan.

 While the first side was down on the hot pan I brushed the uncooked side with softened butter.

 Within a minute or two the bread starts to bubble. That tells me it's time to flip the bread over.

 When I flip the bread over I brush the cooked side with butter and let it cook for another minute to make sure both sides have these lovely grill marks. As each piece of bread is cooked I put it in a warm oven as I cook the rest of the pieces of bread...it's hard to wait until all the bread is done to dig in...but I do my best...did I say there were 16 dough balls? Maybe I miscounted...maybe there were only 15 dough balls...hmmm weird.

This naan bread was really good with the mujadara and tzatziki I made that night for a meatless meal. We used the naan to scoop up a little of each item for the perfect bite. We did have some naan leftover so GoodMan made a naan/mujadara/tzatziki sandwich (sort of like a gyro or a taco) to work the next day, and I had peanut butter and jelly on naan for breakfast the next morning (even with a little garlic in the naan the pbj tasted great).

If you're looking for something new to try on your family this might just be the thing to try!

The official recipe for Naan:

1 package dry yeast
1 cup warm water
1/4 cup sugar
1/4 cup milk
1 egg, beaten
2 teaspoons salt
4 cups flour (somewhere between 3 1/2 - 4 1/2 cups depending on humidity)
4 cloves garlic, minced
1/4 cup butter, softened

Mix yeast, water and sugar in a bowl and set aside for 10 minutes, until foamy.
Mix in milk, egg, salt, and enough flour to make a soft dough. Mix for 2 minutes. Add enough flour to make dough pull away from the side of the bowl. 
Turn mixer on lowest speed and knead for 8 minutes.
Put dough into a greased bowl and cover with a towel to let rise for 1 hour.
Punch down dough and knead in minced garlic.
Break apart into 16 dough balls and set on a tray.
Cover tray with a towel and let rise for 30 minutes.
Heat a grill pan over medium high heat.
Add 2 tablespoons olive oil to the hot pan.
Roll out one dough ball and place on the hot oiled grill pan.
Brush top of dough with softened butter.
When dough begins to bubble, flip over.
Brush cooked side with butter and cook another 1 minute or until the other side is browned and the bread is cooked through.
Put bread in a warm oven to rest while cooking the remaining dough balls.

What was the taste tester's bottom line?
We loved it! We ate it all and wanted to put it back on the menu as soon as we could!

The bottom line: I think more Indian food is in our future.