Saturday, March 31, 2012

A Kinder-Gentler April Fool's Day


  I don't like to be startled...
I don't like to be embarrassed...
I don't like to feel like a fool...
for these reasons April Fool's Day 
was always a day to be avoided. 

  When my boys were very young I tried to convince them that April Fool's Day was a day to do silly things like eat our dinner backwards with dessert first, and salad last. We'd wear our clothes inside out, eat lunch in the livingroom on a tablecloth on the floor, and tried to say as many rhyming words as we could. I almost had them convinced that was what April Fool's Day was all about...and then they started school. Once they were told about pranks and tricks it was all over...I was subject to the usual little boy pranks like..."Mom, Shane's hurt! Come quick!" Only to find Shane with ketchup running down his shirt...Ugh!
  Now that I have grandchildren I am trying to bring back "kinder-gentler" pranks...the other day I pulled a gentle prank on some of them. We were out of milk at my house and three of the grandkids were over. GoodMan took the three of them to pick up a gallon of milk for breakfast. When they came in I looked at the milk and exclaimed, "You bought Magic Milk, I thought you were buying regular milk!" (It helps that none of the grandkids we had that day were readers.) I had the kids tell me what kind of cereal they wanted for breakfast and then had them sit at the table. I sneakily put a few drops of food coloring in each bowl; blue for the boys and pink for the girls. Then I poured their cereal into the bowls and set their cereal bowls and spoons in front of them. I brought the "Magic Milk" out to the table and when I poured the milk it "magically" turned colors. The boys' cereal milk turned blue and the girls' cereal milk turned pink. The kids thought it was really neat that the "Magic Milk" somehow knew which of them was a boy and which was a girl.
  When the grandkids get a little older we'll play another favorite gentle April Fool's game. We'll have a mystery dinner where we write up a menu listing the dinner's ingredients ~ but using different names like "Angelic Orbs" for deviled eggs, and "squirmy worms" for spaghetti. And ask the kids to place their order. It brings lots of laughs as the kids try to figure out what they're ordering. 
  My dad used to play word game tricks on my me and my brothers and sisters when we were kids. He'd say, "I bet I can jump higher than that telephone pole." We'd take him up on his bet and he'd jump an inch or two off the ground...we'd laugh and assume we'd won the bet and he'd laugh and say "I jumped this high, now let me see how high the telephone pole can jump!"
  I usually dread April Fool's Day because I don't like to be startled, embarrassed, or feel like a fool...if I could just convince one generation April Fool's Day is all about being silly, I'd look forward to April 1st again.


  What does your family do on April Fool's Day? Do you keep it silly, or do you like to pull pranks? What was your favorite April Fool's Day?


Friday, March 30, 2012

Pan-Fried Fish

This is pan-fried rainbow trout with lemon caper sauce.
  I'm not going to bore you with my "fish-is-yucky-but-it's-good-for-me" dilemma. Okay, I guess I just did...but since I found a cooking method that turns "yucky fish" into "I could eat this" fish for me and, "Wow-this-is-great!" fish for GoodMan, I thought I would pass on the information.
  It really is a good way of cooking fish. It's easy, doesn't take a lot of weird ingredients, doesn't make a huge mess of the kitchen, can be used on a lot of different varieties of fish, and really does taste good.
This is pan-fried whiting with lemon butter sauce (as well as creamed peas and spring salad).


  This is not so much about the type of fish, or the type of sauce, but about the style of cooking the fish. With this method of pan-frying, the fish is cooked skin-side down first. This gets the skin crispy. For people who like fish skin (oh gross, I can hardly even type that!) preparing the skin crispy is a plus. For those of us not crazy enough to like fish skin it makes it so the fish "meat" comes off the yucky skin and the yucky skin stays on the plate to be scraped into the garbage as nature intended.
  If you like crispy fish skin or, like me, you don't want any of the yucky skin to sneak it's way onto your fork, I will show you how it's done:
In this case I started with one large rainbow trout fillet and cut it in half. I sprinkled salt and pepper on the flesh side and then dredged it lightly in plain flour. And then I shook off the excess flour.

 I put my large fry pan on the stove over medium high heat and let the pan get hot. Then I put in 3 tablespoons of olive oil and one tablespoon of butter. When the butter stopped foaming (which means the butter was hot) I put the fish fillets in the pan skin side down. I immediately shook the pan back and forth to make sure the fish did not stick to the pan.

I cooked the skin side for about 4 minutes, until it was golden brown and looked crispy. Then I carefully flipped the fillets over and cooked them on the other side for about 3 or 4 more minutes, until the flesh looked opaque. At that point I removed the fish from the fry pan and put it on a warm plate.


This is were the sauce comes in. Sometimes I make lemon caper sauce by adding a tablespoon of drained capers and squeeze a fresh lemon into the pan and cooking just about a minute and then poured it over the fish.


This is what the fish looked like with the lemon caper sauce.

Sometimes I use this pan frying method to make other kinds of fish. I made whiting with it recently. That time I used all the same steps until it got to the sauce. For that fish I made a lemon butter sauce. After I took the fish out of the fry pan I added another tablespoon of butter and squeezed a lemon into the pan. I cooked it for less than a minute ~ just long enough to warm the butter and juice, and then I poured the sauce over the whiting.

This is whiting with lemon butter sauce.

 This method of cooking fish works well for fillets and especially for fillets with (yucky) skin. Through trial and error ~ way too many errors ~ I've found whitefish, bluegill, walleye and rainbow trout all work well with this method. Whiting was okay, but we liked other types of fish better. We were not impressed with catfish, tilapia or swai cooked with this method. They are too moist and without skin the fish tends to fall apart

What was the taste tester's bottom line?
GoodMan is thrilled that I'm trying all these fish recipes, and this is one of his favorites. I found myself actually enjoying these taste tests. I have my favorites. I like whitefish and rainbow trout best. My mother was visiting one of the days we had rainbow trout. After finishing her meal and telling me how much she enjoyed it she asked what kind of fish it was. When I told her "rainbow trout"  she was quite surprised. She said she'd never liked trout in the past ~ and she's a fish eater!

The bottom line: GoodMan and I are working toward a "less red meat" diet. This is one method of cooking fish to add to my repertoire. And with this method of cooking fish I may even like fish ~ but I will never, never I tell you, like the yucky skin!


Thursday, March 29, 2012

Decidedly Delicious Crock Pot Chicken

I can't say enough good things about this recipe. It is so easy. It is so versatile. It is so incredible, scrumptious, and well...decidedly delicious!!

This started out as a recipe I found on Pinterest. There are a few different variations out there. One called "Easy Chicken with Rice", one called "Crock Pot Angel Chicken", and my recipe is another adaptation. I've made this dish a few times. Each time I've changed it up a little bit and it has been a major hit each and every time. 

My family is very accommodating. I rarely have anyone ask for something specific. But when my mother came for a visit she specifically asked me to make this dish for her. She told me she'd thought about this dish often since her last visit. It was no problem whatsoever to grant her wish.

Let me show you how it is done:

The basic recipe calls for 2 pounds of frozen boneless chicken ~ about 3 breasts cut into pieces or 10 chicken tender pieces,  1 package of cream cheese, 1 can of cream of chicken soup, and 1 envelope of Italian dressing mix.
I add 1 cup of milk and a variety of vegetables. Sometimes I add mushrooms and onions, sometimes I add peas and carrots, sometimes I add broccoli. 
The flavor magic is the dry Italian dressing mix, so make sure you don't skip or adjust that!

 I mix the cream cheese, soup, dry dressing mix, and milk and then add the chicken pieces and put it all in a crock pot. The chicken should be frozen when you start the crock pot so that it doesn't cook too soon and become mushy. The day I made this I doubled the recipe. If I use frozen vegetables I usually put them in the last hour. If I use fresh vegetables I usually put them in at the beginning. I set the crock pot on high and cook for 4 hours or on low for 6 hours. This is not a good crock pot recipe for all-day cooking. It's better for a day when you'll be shopping or busy for just half the day. I don't recommend an 8 hour cook time.
I added peas the last half hour and served it over white rice. This picture doesn't do justice to the dish. The flavor is incredible! It is good over noodles, rice, and I would imagine it would be good over mashed potatoes, though I've never tried that myself. If you add mixed vegetables and leave out the extra milk it tastes great between two crusts for chicken pot pie. 

I like to double the recipe so I have leftovers to use for a "Round Two" meal. I like to mix the leftovers with noodles and cheese and put it in a casserole with buttered crumbs on top. And I intend to use the leftovers from this meal for a casserole with rice, vegetables, shredded cheese, and put I'll put a layer of crescent roll over the top. 


I can't remember another recipe with so much available variation. I don't think I've ever had a recipe so well received by so many taste testers...I don't think I've ever had something so decidedly delicious!


What was the taste tester's bottom line?
 Did you notice? All these testers are in the picky-eater age group. It is really difficult to get thumbs up from all three of these kids all on the same dish. Usually one likes one kind of food and the others like something different. This is one dish their mom can make that everyone likes! Yea!!


The bottom line: Watch for sales on chicken, soup, cream cheese, and Italian dressing mix.


Wednesday, March 28, 2012

Easter Deviled Eggs


Coloring eggs for Easter...it's a tradition!...Deviled eggs made out of the colored hard boiled eggs...it's a tradition! How about coloring the egg whites? Time for a new tradition!

I saw this on...(wait for it)...Pinterest. Do you get bored from reading that on almost every post? I'm sorry, but it's true. I've found a lot of cool stuff on Pinterest and I'm making it my mission to share some of the best stuff with you. Just be glad you don't have to lose mega-hours of your life surfing Pinterest for these golden nuggets, 'cuz I'm doing it for you!

The original site for the colored deviled eggs is a blog called Foodjimoto. You should really check that site out. Their eggs are a lovely pastel color. Mine turned out quite a bit darker, but I still thought they were pretty.

This is how I made mine:

 I cook my eggs in a steamer. This is the kind of steamer you use for steamed vegetables. I find it works really well for hard boiled eggs too. When the eggs were cooked I let them cool and then peeled them.
I sliced the eggs in half and put the yolks in a quart size ziplock bag. 
I rinsed the leftover egg bits off of the whites and put them on a piece of paper towel to dry.
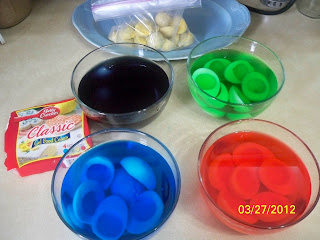
Then I put warm water in four bowls and added regular food coloring. I did not use vinegar because I was concerned about a residual flavor. I put the egg white halves into the colored water and let them sit in the water while I made the yolk filling.
I made the yolk portion of the deviled eggs just as I normally do. I added about a half of a cup of mayo, a tablespoon of hot dog relish (mustard and pickle relish mix) and about 1/4 teaspoon of seasoned salt. 

Then I closed the top of the ziplock bag and squished the bag and kept squishing it in my hands until all the yolk ingredients were blended. Then I put the bag aside and checked on the egg whites.
When the eggs were the desired color I took them out and let them dry off on a paper towel. Be sure to check on the colors often. Each time I've made these they've turned darker than I intend them to be.
I snip the corner off of the ziplock bag and use it to pipe the filling into the egg whites.
Then I just filled them as I normally would.
  I gave each egg a slight sprinkle with paprika and then snapped this photo.
These were fun to make and I couldn't wait to show them to my taste testers!

What was the taste tester's bottom line?
GoodMan enjoying an Easter Egg


 Everyone thought they looked really cool! Those who like deviled eggs liked these, those who don't like deviled eggs just liked the way they looked.


The bottom line: I'll keep this in my Easter holiday repertoire.


Tuesday, March 27, 2012

Rice Krispie Easter Nests


I love holidays! I enjoy all of them...well maybe not "Scrub Your Bathroom Grout Day" but just about any other holiday. I really enjoy seeing the holiday through the eyes of my grandkids. I'm always looking for fun and easy decorations and treats to make good memories for my family. When I saw a picture of these little nests on Pinterest I had to try them for myself. The recipe originally came from Kellogg's.

This is my spin on this little treat:

 I put sweetened coconut in a ziplock bag and added green food coloring. I closed the bag up tight and then shook and kneaded the bag until the coconut turned green. 

 Next, I made a batch of Rice Krispie Treats using the recipe on the side of the Rice Krispie cereal box. The only change I made was I used 1/2 chocolate marshmallows because I had some left over after hot cocoa season and I figured it would give my nests a more natural color. In the future unless I have chocolate marshmallows to use up I will probably use all white marshmallows. Either way is fine.


I sprayed a mini muffin pan with PAM and quickly put about a rounded tablespoon of cooked cereal mixture in each cup. I sprayed my hands with PAM and pushed the mixture into the cups to form small nest shapes. This was a sticky, messy job! I wasn't sure if the end result was going to be worth the mess.

I sprinkled the green coconut into the cup and then added a couple of jelly beans to each nest. I think they came out quite cute...but what did the taste testers think?

What was the taste tester's bottom line?

I guess these pictures tell it all!

The bottom line: Although the Rice Krispie Treat recipe is messy to make, it is worthwhile when you see the happiness it brings to the taste testers!
Isn't that just too cute?!


Monday, March 26, 2012

Minty Creamed Peas with Onions and Mushrooms

  I've been looking for new side dishes for Easter Dinner. Minty creamed peas sound yummy, comforting, and different. And I'm ready for different. I found this recipe in a new cookbook I got at an Irish cooking seminar I attended. The cookbook is called "Food to Love" by Edward Hayden. I'm really enjoying reading through it and I'll be trying some more of his recipes in the weeks to come.
  Let me show you how I made this dish.

 I gathered the ingredients; frozen peas, mushrooms, onion, garlic, mint, cream, salt and pepper (I also used some olive oil for sauteing.)

 I chopped the onions in thin strips, but you could also dice them if you prefer. I chopped mini bella mushrooms, you could use thinly sliced white mushrooms. I also finely diced garlic.

  I stripped the mint leaves off the stems and then finely diced the mint leaves (I saved the stems...)

I sauteed the onions, mushrooms and garlic in a little olive oil. I didn't take a picture of it, but I added the mint stems and sauteed them along with the other vegetables to impart even more minty flavor. If you decide to do this you should either tie them with a string to make them easier to pull out, or count how many you put in so you will be sure to take all of them out.

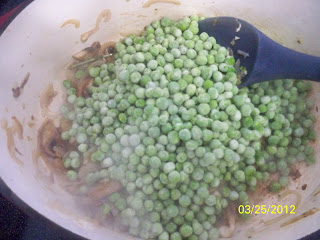
When the vegetables were tender I added the frozen peas and sauteed them with the other vegetables for about 4 minutes.

About this time it looked like this...peas and other vegetables, but no sauce.


I added one cup of heavy cream and let it simmer for about 5 minutes to thicken slightly.


After the peas and cream mixture had cooked for about 5 minutes I removed the mint stems and added the chopped mint leaves. I let the mixture cook for just another minute and then I added salt and pepper to taste (I put in about 1/4 teaspoon of salt and 1/8 teaspoon of pepper).


I served the lovely creamed peas with  pan fried whiting and a spring salad. I don't know how this looks to you, but to me it is a beautiful sight to behold!


This is the official recipe for Minty Creamed Peas with Onions and Mushrooms
(adapted from "Food to Love" by Edward Hayden)


1 pound frozen peas
1 medium sweet onion, thinly sliced
4 cloves garlic, finely diced
1/4 pound Mini Bella mushrooms, thinly sliced or chopped
olive oil for saute'
1 cup heavy cream
2 tablespoons mint leaves, freshly chopped (save the stems)
Salt and freshly ground black pepper to taste (approx 1/4 tsp salt and 1/8 tsp pepper)


In a large saucepan or dutch oven saute' the onion, garlic, and mushrooms in a small amount of olive oil, until vegetables are soft and golden brown.
Add the frozen peas and mint stems to the softened vegetables and allow to cook gently for about 5 minutes.
Add the cream and cook until the peas have softened and the cream has thickened slightly.
Remove the mint stems and put the chopped mint leaves in.
Add salt and pepper to taste.


What was the taste tester's bottom line?
For this dish GoodMan and my mother joined me in taste testing. I told them this is a test for an Easter dinner side dish. Everyone agreed it is a dish for special occasions (heavy cream is not an everyday ingredient). It gave a special feeling to an ordinary fish dinner. The mint is not overpowering, but is an unexpected treat in an old fashioned side dish. 


The bottom line: This will be a part of my holiday menu plan. We may even plant some mint in our garden to have on hand for dishes like this.