Pages

Saturday, March 24, 2012

Roasted Banana Boats

Yummy...

Sweet...

Warm...

Gooey...

Soft...

Crunchy ...

And...

FUN!!

Remember Hobo Pies, S'Mores, Pudgie Pies, roasted marshmallows, and hot dogs on a stick? All of these are traditional campfire goodies. Some people have memories of roasted or grilled bananas with various toppings as their camp fire treats. But you don't have to go camping, or even wait until it's grill season to enjoy this treat...

Let me show you how to have fun any time of the year...

This treat is always best with a fun group of people. I like to have kids around to put together their own banana boats. Kids love to come up with unusual combinations.

 First gather the ingredients. I got out ripe bananas, peanut butter, coconut, chocolate chunks, and cashews ~ but just about any topping would work. You might try butterscotch chips, miniature marshmallows, even other fruits like berries.


I put each banana individually on a piece of aluminum foil and slice through the skin of the banana, through the banana ~ but not through the other side of the peel.

 We filled our bananas with our favorite toppings. For the peanut butter I put some in a ziplock sandwich bag and clipped the corner of the bag so I could squeeze the peanut butter inside neatly. Next came coconut, chocolate chunks and nuts on top.

We sealed our bananas tightly and individually in the foil and then put them in a baking dish. If you are using a grill you can put them right on the grill and if you have a campfire you can tuck them into the coals. I baked them in a 400 degree oven for about 20 minutes. The time depends somewhat on the ripeness of the banana and how much filling you have so you may have to check them starting at about 10 minutes. You want the chocolate to melt and the banana to become soft and sort of caramelized.

When you take them out the banana skin is black and the fillings are all melty and sweet. Traditionally this is eaten right out of the peel with a spoon. Some people leave it in the foil, cut them in half and squeeze the filling out right into their mouths (I'd save that for rustic camping!). This is good with vanilla ice cream ~ but that's kind of cheating since campers rarely have a freezer to store ice cream...but since we're not camping...I'm heading out to the store for a big fat tub of ice cream...Vanilla? Chocolate? How about Neapolitan?


What was the taste tester's bottom line?
The black banana peel can be a turn off, but people tend to be less picky when they are camping. The "Gee Whiz" factor is high when you're camping. I think ice cream helps when you are at home. People can overlook blackened banana peel when they are scooping their ooey gooey banana goodness over a dish of ice cream and kids get a kick out of concocting a unique creation.


The bottom line: Watch for ripe bananas, and remember to get the ice cream.

Thursday, March 22, 2012

Asparagus and Fennel Tart


I look at a lot of recipes. I see them on Pinterest. I watch the Food Network. I get 3 cooking magazines every month as well as countless other magazine and newspaper recipes. And I have so many cookbooks it's ridiculous. One of the things I really enjoy is finding a new way to cook an old favorite. This recipe is like that. I saw a beautiful picture of an asparagus tart in the Food Network magazine and I thought it might be good for an Easter brunch. It was time for a taste tester's test...

I had puff pastry in the freezer and some fresh asparagus in the refrigerator. The original recipe does not call for fennel, but since I had some in the refrigerator I decided to add it. I picked up the cheese on my next trip in to the big city grocery store and decided to make Asparagus Fennel Tart to go along with some pan fried rainbow trout for dinner. Anyone who has read my blog since the beginning knows how I feel about fish...trying a new vegetable dish was just the treat I needed to offset the "fish-for-dinner-dilemma".

Let me show you how I did it:

I started by setting puff pastry out to thaw for about 1/2 hour while I prepared the vegetables.


Then I blanched (put in boiling water for a short time) the asparagus in boiling water for about 4 minutes and then immediately put them in ice water to stop them from overcooking. You want the asparagus crisp-tender (not mushy).

 After a minute or two in the ice bath I drained the asparagus and patted it dry with paper towel.


 I chopped up a fennel bulb in strips...at this point I should tell you I've decided not to add fennel in the future. I thought I would caramelize the fennel and use it sort of like onion on the tart, but it has a strong flavor and a little crunchier texture than onion. If you love fennel it would be perfect. I wanted to highlight the asparagus more, so next time I will leave the fennel out.


I finely chopped the shallot.


I sauteed the fennel and shallots in a little olive oil. The fennel was not softening as much as I hoped to I added white wine and continued to cook on top of the stove for about 10 minutes. I don't have a measurement for the wine...I just added about 1/4 cup at a time and let it cook down to caramelize the fennel and shallots.

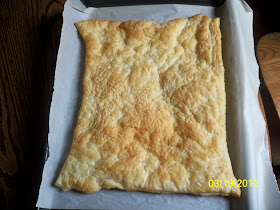
I preheated the oven to 400 degrees and then I rolled out the puff pastry on a floured board to remove the creases and to make it a little larger ~ about 10"x14". I transferred it to a parchment lined baking sheet and pricked it all over with a fork. 


I baked the puff pastry for about 12 minutes, until it was golden brown. I took it out of the oven and let it cool a little while I prepared the toppings.


In a large glass bowl I whisked two egg yolks, the milk, salt, pepper, and nutmeg.


I shredded 8 ounces of Guyere cheese and stirred it into the egg mixture.

I spread the egg and cheese mixture on top of the puff pastry, leaving about a half an inch of border all the way around.

 I put the caramelized fennel and shallots on top of the cheese mixture and then arranged the asparagus on top. I must have been excited to get it back in the oven, because I forgot to take a picture of it before I put it in the oven!

 This is how it looked after I took it out of the oven and sprinkled the lemon zest on top.


I used a pizza cutter to cut the asparagus tart into squares and served it with rainbow trout for dinner.


The official recipe for Asparagus and Fennel Tart:


1 sheet of puff pastry, thawed
1 pound asparagus, trimmed
1 fennel bulb, trimmed and chopped into strips**
1 shallot, finely diced
2 tablespoons olive oil**
white wine (approximately 1/2 cup)**
2 egg yolks
3 tablespoons milk
1/4 teaspoon nutmeg
1/4 teaspoon salt
1/8 teaspoon black pepper
8 ounces Guyere cheese, grated
1 tablespoon lemon zest


   Preheat oven to 400 degrees. On a floured board, roll out puff pastry to a 10"x14" rectangle. Transfer to a parchment lined baking sheet and prick all over with a fork. Bake 12 minutes until golden brown. Set aside.
   Blanch asparagus for about 4 minutes until tender-crisp and then put in an ice bath. Drain, pat dry, and set aside.
   In a saute pan on top of the stove, add olive oil and heat to medium high. Add fennel and caramelize. Use white wine as needed to keep the fennel from sticking to the pan. Add the shallots and cook for another 2 minutes.
   In a large bowl, whisk egg yolks and whisk in milk, salt, pepper, and nutmeg. Stir the shredded cheese into the egg mixture. 
   Spread the egg and cheese mixture over the puff pastry crust. Leave a 1/2 inch border on all sides.
   Add the caramelized fennel and shallots to the top of the cheese mixture.
   Arrange the asparagus on top of the fennel.
   Bake at 400 degrees for 18-20 minutes, until the cheese mixture is melted and set.
   Sprinkle lemon zest on top.
   Serve warm or room temperature.

** In the future I will not use the fennel because it overpowers the flavor of the asparagus. I will skip the caramelizing all together, so I will not need the fennel, olive oil, and white wine. I will whisk the shallots into the egg mixture.


What was the taste testers bottom line?
I thought this had a beautiful presentation. The fennel was a little crunchy and the flavor overpowered the asparagus. I took the fennel off of a piece of the tart and found I liked it much better. GoodMan thought it seemed a little "fussy" for a regular weeknight meal.

The bottom line: I will take out the fennel in the future and plan to serve this on special occasions like Easter brunch or a ladies luncheon.

Wednesday, March 21, 2012

Magic Bars

Recently my grandson came home from school
with a note asking for volunteers to bake
some kind of treat using coconut
for a party celebrating the end
of a unit on islands.

He REALLY wanted me to
 bake something for his class.

The first thing that came to mind was Magic Bars.

They've been around forever...
although it wasn't very original
it was easy, yummy, and contains coconut.

It didn't occur to me to take pictures of the process 
because I figured EVERYBODY knows how to make Magic Bars...

Boy, was I wrong!

The kids in my grandson's class 
really liked the treats,
and three moms asked for the recipe.

I guess not EVERYBODY has had Magic Bars...
Maybe it's time for the next generation to learn how easy they are to make.

I decided to make another batch for a weekend gathering coming up and I snapped pictures of the process for the moms who wanted the recipe.

Here goes:

 First, I prepared a 9x13 glass pan by covering it with aluminum foil with some excess on the ends. This helps to lift the bars out of the pan when they're done. I sprayed the foil lightly with PAM and preheated my oven to 350 degrees.
 
In a medium size bowl I combined 1 1/2 cups of graham cracker crumbs and 10 tablespoons of melted butter, then dumped the buttery crumbs into my prepared pan.
 I used an off-set spatula to press the buttery graham cracker crumbs into the bottom of my prepared pan.
 
 Then I sprinkled one cup of sweetened coconut on top.

And then I sprinkled 2 cups of chocolate chips on top. You can use 1 cup of butterscotch chips and 1 cup of chocolate chips ~ but I just used all chocolate.

Then I sprinkled chopped pecans liberally over the top. I would say I use about 1 1/2 cups of nuts. I like pecans, but walnuts work well too.
 And then I pour one can of sweetened condensed milk over the top. Now it's time to put it in the oven for 25-30 minutes or until it is golden on the edges.
 
 When it's done I set it on a rack to cool. After about 1/2 hour I lift the foil out of the pan and continue to let the bars cool before cutting.

The bars come out ooey, gooey, nutty, chocolatey, sweet, and scrumptious.
What else could you want from a treat?


This is my recipe for Magic Bars:


1 1/2 cups graham cracker crumbs
10 tablespoons butter, melted
1 cup sweetened shredded coconut
2 cups semi-sweetened chocolate chips
1 1/2 cups chopped pecans
1 can sweetened condensed milk


Preheat oven to 350 degrees. Prepare 9x13 glass pan by lining with foil with extra on the ends to use as handles to lift bars out after baking. Spray foil lightly with PAM.
In a medium bowl, combine graham cracker crumbs with melted butter.
Press graham cracker mixture into the foil lined pan.
Sprinkle coconut on top of graham cracker mixture.
Sprinkle chocolate chips on top of coconut.
Sprinkle chopped nuts on top of chocolate chips.
Pour sweetened condensed milk over the top.
Bake for 25-30 minutes or until the edges are golden.
Cool in the pan on a rack for 1/2 hour.
Use foil on edges as a handle and remove bars from the pan.
Cool the rest of the way on a wire rack before cutting into bars.

What is the taste tester's bottom line?
These have been a favorite of many families for many years. I'm almost embarrassed to write up this blog post ~ except for the fact that so many young moms in my grandson's class wanted the recipe. I guess it's time for my generation to pass the torch to the next generation.


The bottom line: Sometimes it's good to dust off some of the oldies-but-goodies!


What oldie-but-goodie recipe does your family like?


Tuesday, March 20, 2012

The Beer Bread Challenge

I really like Tastefully Simple's Beer Bread Mix.
Unfortunately, I don't always have some on hand.
And it's not something I can just pick up at the store.
Recently I saw a post on a blog called 
The Backyard Pioneer for beer bread.
As it happened I was waiting for my order 
from Tastefully Simple to arrive so I 
figured it would be a great time to give another
beer bread recipe a try.
Tastefully Simple's Bountiful Beer Bread Mix
only calls for 2 added ingredients;
one can of beer and 1/4 cup of melted butter. 
You can't get any easier without buying ready-made.

I wondered if a "from scratch" recipe 
could be easy enough
and taste good enough
 to replace a proven favorite...
another incentive is the difference in cost. 
Tastefully Simple's dry mix costs almost $6 per loaf.
The dry ingredients for a "from scratch" loaf 
would be less than $1.

I wondered about the difficulty 
of making it from scratch, 
and would my taste testers 
be able to tell the difference?
So a beer bread challenge was on...
This is how I made the "from scratch" beer bread:
 I gathered the ingredients; flour, sugar, baking powder, salt, beer, and butter.

I sifted the flour into a large bowl.

I added the rest of the dry ingredients and gave it a little stir.

Then the part I think is the most fun...I poured in the stinky beer and watched it foam all over.

I stirred it just enough to combine the wet and dry ingredients and then I put the dough into a greased bread pan.

Then I poured 1/2 stick of melted butter over the top and put the pan in a preheated 375 degree oven for 55 minutes...that wasn't too hard at all!!

This is what it looked like when it came out of the oven.

This is what it looked like as we sliced through the loaf...(Tastefully Simple's loaf is crumbly when it is warm too)

Would my taste testers know the difference?
This is the official recipe for beer bread from The Backyard Pioneer :
  • 3 cups flour (sifted)
  • 3 teaspoons  baking powder
  • 1 teaspoon salt
  • 1/4 cup sugar
  • 1 (12 ounce) can beer
  • 1/4 cup melted butter
Preheat oven to 375 degrees. Spray a bread pan with PAM.
In a large mixing bowl, combine dry ingredients.
Pour in beer.
Stir just to combine wet and dry ingredients.
Put dough in bread pan and pour melted butter over the top.
Bake for 55 to 60 minutes, or until toothpick inserted in the center comes out clean.
Cool on a wire rack for 10 minutes before removing from bread pan.

What was the taste tester's bottom line?
Well, my taste testers didn't have a clue that this bread was any different than the one I usually make from Tastefully Simple. I could tell the difference. I think the Tastefully Simple mix is perhaps a little sweeter. I don't think there is a big enough difference in the taste or in the amount of work to justify the extra cost of the Tastefully Simple mix.

The bottom line: My order from Tastefully Simple has now arrived. I will use the bread mix that I have, but I will plan to make my beer bread from scratch in the future.

Monday, March 19, 2012

Fruity Flavored Popcorn

I love candied popcorn...

Something about the colorful kernels...

Or maybe the sweet crunchy taste...

Whatever it is, I've loved it since I was a kid.

Last summer I visited Chicago with my family. We stopped at a popcorn store and bought some colorful candied popcorn. It was good, but it was really expensive! I decided to do some research and see if I could find a recipe for candied popcorn I could make at home. I found this recipe at the Kraft Foods website. It's colorful and even better tasting than the candied popcorn I've found in the stores. 

Let me show you how I made it:


First, I gathered the ingredients; 8 cups of popped popcorn (I used the Paper Bag Popcorn recipe from my blog), 1/4 cup butter, 3 tablespoons of light corn syrup, 1/2 cup of granulated sugar, and one small box green gelatin.
 I made this as a St. Patrick's Day treat for my grandkids so I thought I'd make a green batch first. As it turned out I decided to make other flavors so it would be more colorful ~ but these pictures will show you how I made the green (lime) candied popcorn. 

 I preheated the oven to 300 degrees and prepared a 10x15 baking sheet by lining it with foil (after the first batch I decided to use parchment paper because the popcorn tended to stick to the foil and I didn't want to use PAM ~ the parchment paper worked best).

 I put the butter and the corn syrup in a small saucepan and heated it on low until the butter melted.

I added the sugar and the lime jello and stirred to combine the ingredients. I turned the stove up to medium heat and continued to stir until it came to a boil.

When it started boiling I turned a timer on for 5 minutes and turned the burner down slightly, then continued to stir until the time was up.

I poured the hot mixture over the popcorn in a large plastic container. Then I quickly and gently stirred the popcorn and hot mixture to try to coat the popcorn evenly.

At this point it can be made into popcorn balls, but I spread the popcorn out on the prepared baking sheet and then baked it for 10 minutes at 300 degrees. When the time was up I pulled it from the oven and let it cool on the pan for about 5 minutes and then I broke it into pieces and put it in an airtight container.

I went back and made two more batches, one orange and one grape. I added food coloring to the orange and grape flavors because I felt the green didn't come out as bright as I wanted. I was happy with the food color results ~ I will use that for green in the future.

This is the official recipe for Fruity Flavored Popcorn

8 cups popped popcorn
1/4 cup butter
3 tablespoons light corn syrup
1/2 cup granulated sugar
1 small box flavored gelatin
food coloring (whatever color coordinates with the flavor jello you're using)

Preheat oven to 300 degrees. Prepare 10x15 baking sheet by lining it with parchment paper, set aside
Put popcorn in large plastic bowl, set aside
Add butter and corn syrup to a small saucepan set on low heat. Stir until butter is melted. 
Add sugar and powdered jello.
Stir and turn heat up to medium.
When mixture starts to boil set a timer for 5 minutes and turn heat down slightly. Boil and stir until the time is up.
Pour hot mixture over the popcorn and quickly and gently stir to cover popcorn.
Put popcorn mixture on parchment lined pan and carefully (because it is hot!) spread the popcorn mixture out.
Bake for 10 minutes.
Cool on the pan for 5 minutes and then break up and put in air tight container.

***Hint*** Set the mixing bowl, saucepan and stir spatula in a sink full of hot soapy water as soon as possible to let them soak because the candy coating is very hard to clean up if it has a chance to harden.

 What was the taste tester's bottom line?
We really enjoyed the flavor of this popcorn. The kids each had their favorite flavor. Those who didn't like popcorn, didn't like this. It tends to be sticky ~ not so much on the hands, but on the teeth. I've made candied popcorn before, but it never had the intensity of fruity flavor like this does. The jello is a wonderful addition! We have to keep in mind this is candy and show some portion control and also remind the kids to do an extra good job brushing their teeth afterward!

The bottom line: This is a good treat for kids parties, classroom treats, and anytime a special colorful treat is needed.